We've all been there. You accidentally enter the wrong password into your phone too many times, and suddenly, you're locked out of the device for good. Maybe your kid or a friend of yours took your phone and, as a joke or an accident, entered the wrong code one too many times. Maybe it's your secondary phone and it's been sitting in a drawer for a couple months and now you need it – but you forgot the code. With photos of our friends and family, our entire music collection, and our contacts library saved on our devices, one can't just be expected to hard reset the phone if something goes wrong with the passcode on the device.
Being locked out of our phones feels a lot like being locked out of our entire life. That said, you don't have to worry about trying to find a way out from phone purgatory. If you've accidentally triggered a permanent lockout of your phone, or you're not quite there yet but you know you've forgotten the password, you might feel the need to start panicking. Maybe you haven't forgotten the code to your phone, but you're looking for a smarter way to unlock the device when you're using it day-to-day. If you're curious about how phone unlocks work, whether trying to get into your locked device or just trying to make sure you don't accidentally lock yourself out, you've come to the right guide. With any luck, we'll be able to get you back into your phone without losing an ounce of data. And for those users who haven't lost their passcodes but are simply trying to use their phones in a smarter, more secure way, we have some tips for you too. This is how to unlock your Android phone.
Forgotten Passcodes
You've picked up your phone to check your text messages or your email, only to realize that something is wrong with your passcode. Despite knowing that you've set the password to be, let's say, your first child's birthday, nothing seems to be working. Your phone continues to tell you the password is wrong, but you've checked the spelling three times. Finally, your phone alerts you that you've been locked out of the device for the time being. What to do when you need your phone to pay for groceries, call an Uber, or check Instagram while waiting in line at the bank. If you've forgotten your passcode, you aren't completely out of luck just yet.

Try Variations on Your Passcode
Are you entirely sure you aren't misremembering your password? The first piece of advice we would give you is to ensure your passcode isn't being mixed up, or that you aren't forgetting a key piece of your passcode that happens to come at the end of the phrase. Plenty of us often forget about little tweaks to passwords we've added in order to ensure that our devices are as secure as possible. Here are some tips to making sure you're remembering every piece of your passcode:
- Capital letters: If you're using a passcode phrase, you might've forgotten to add in any capital letters to your text. Make sure you remember to place the capital letters correctly as well; we've all forgotten the correct word or letter to capitalize in passcodes like this.
- Numbers: Sometimes you forget about the number you added on your passcode a couple days ago. If your passphrase spells out "WaterInJuly382," you'll want to make sure you remember to enter the "382" part of the password. Don't be surprised if you accidentally forget to add the numbers onto your passcode. It happens to the best of us.
- Special characters: Just like the capital letters, sometimes we add special characters into our passcodes to make them as complex as possible, only to forget the characters just hours later. Think back to decide whether you added an exclamation point, a dollar sign, or any other special character to your code in order to protect your data. It might make the difference between a lost passcode and saving your data.

Find My Mobile (Samsung Devices Only)
Are you using a Galaxy S9 or a Galaxy Note 8? You might be in luck: Samsung's own Find My Mobile tool features an additional feature not offered by Google's own Find My Device tool. Find My Mobile is similar to Find My Device or Find My Phone on iOS, but developed by Samsung specifically for their devices. For the most part, it does the same stuff you'd expect: Find My Mobile can locate your phone using GPS, make the device ring when you lose it in your couch cushions, and can even backup your data remotely using the web app offered by Samsung. More importantly, however, is the app's ability to unlock your device from your computer even if you've forgotten the passcode for the device.

There's a catch: if you haven't set up your Samsung account on your Galaxy S-device, you won't be able to do this. Like most of Samsung's tools, you need a Samsung account to log into the site and to unlock your device. Assuming you have set up your Samsung account—and haven't forgotten the passcode to that account—you should be able to unlock your device using the Find My Mobile web app here. All you need to do is sign in with your Samsung account, select the option to remotely unlock your device, and you'll be all set to go.
It's important to note that unlocking your device remotely does clear the biometric data off your device, so any fingerprints or iris scans you have saved on your device will have to be added back to your phone – small price to pay for saving your device's data in the long run.

As we mentioned, Google has a similar utility for all Android phones called "Find My Device," which only features the option to lock your device, not unlock it. If you've forgotten your passcode, all Find My Device will do is locate the device by GPS, re-lock the screen, and erase data; it won't be able to unlock the screen from the cloud.
Last Resort: Resetting Your Device
Unfortunately, thanks to the security enhancements added to Android 5.0 and above, most modern devices that aren't made by Samsung will have to be reset in order to bypass the password. Yes, this means you'll need to set your phone up again from scratch, re-downloading apps, music, and any other content you have saved on your mobile device. Being locked out of your device makes it difficult to back up any content on your phone, but if you already have some backup methods put in place, you can trigger them by plugging your phone. Both Google Drive backups (Pixel only) and Google Photos backups are often triggered by plugging your phone into a charger, so making sure your device is plugged in is ideal for guaranteeing that your software is saved. We recommend waiting until morning to reset your device if you're locked out; plenty of these backups happen overnight, including most SMS backups if you have an SMS backup app installed and running on your device.
Because you can't access the settings menu to factory reset your phone, you'll need to either use the hardware buttons on your phone to trigger a reset or use Google's Find My Device page in a web browser to reset the phone. Here's how to do each step:

If you're using Google's Find My Device page, load the URL here, sign into your Gmail account, and make sure your phone is selected. On the right side of the display, you'll see a Google Maps layout with a display showing the current location of your phone. On the left side of the display, you'll see a tab with three options: Play Sound, Lock, and Erase. Hit the Erase option to automatically trigger a device reset. Remember that your phone has to be powered on and connected to the internet in order to use this method.

Now, if you don't have access to the phone and can't use Find My Device to restore the phone over the web, you'll need to rely on the second method. To manually erase the device and reset the phone, you'll need to use the hardware buttons to load into your device's recovery system. This is accomplished a little differently on every phone, so your best option is to search for your phone model on Google with the keywords "boot into recovery." Some devices, like Samsung's lineup of phones, are fairly easy to boot into recovery with; you turn off the phone and press and hold a specific button combination to boot into recovery. Other phones, like Google's Pixel 2 XL, are much more finicky, requiring you to press and hold on one key and press and release another at the right time in order to boot into recovery. There are so many various methods for each Android phone, it's basically a requirement to search for the correct method for your phone to do this.

Once you've booted into recovery mode, use your device's volume up and volume down buttons to scroll through the list until you reach "Wipe Data/Factory Reset." Use the power button to select this option, then confirm your selection on the next display. Your phone will begin to reset; make sure the phone is charged enough to ensure it can last at least 30 minutes without dying. Once your phone has rebooted back to the menu screen, you can set up your device by logging back into the Google account you use for your phone. It is vitally important you use the same Google account you used on your phone prior to resetting. Android has a built-in security protocol known as Factory Reset Protection that requires a recently-reset phone to have the same Google account as previously used on the device in order to prevent a thief from immediately using the stolen phone. If you don't have the password for your Google account, you can reset it, but that means you won't be able to log into your phone for 24 hours after the reset.
Backup + Factory Reset
Probably the best combination of things to do does require you plan ahead, and set up a backup of your phone's data to the Google Cloud. This way, even if you have to reset the phone for whatever reason, a reasonably current set of your phone's data will be available, intact, and ready to get your phone back into action. I will walk you through how to set this up. You will need a Google account for this.
To set up backup, follow these steps.
- Go to Settings on your phone.
- Select System->Backup.
- Select Google backup.
- Select "Backup Now"
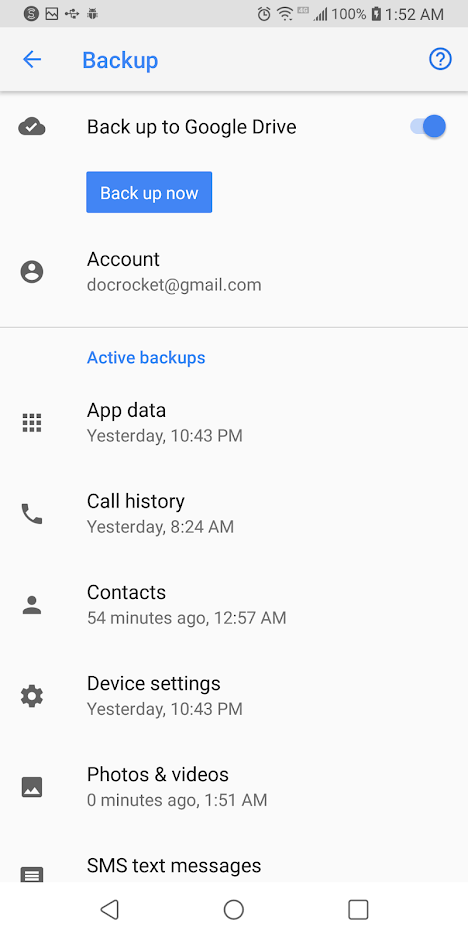
Your phone will now copy the critical data to your Google account.
Restoring from backup is simple. After you reset your phone and attach your Google account to the phone again, it will automatically restore your data from backup. Running a backup takes only a few minutes on a WiFi connection, or even less if you keep your phone regularly backed up – get into the habit of setting off a backup every night when you go to bed and you will always have a near-realtime backup of your phone.
(Want to backup more than just your phone? You can with one of these speedy 4-TB portable hard drives from Toshiba. You can back up all the computers in your household, and still have room for a thousand movies.)
Unlocking Your Phone with Speed
If you aren't having trouble getting into your phone, but you want to make sure your phone is secure while simultaneously unlocking your phone with some serious speed in order to make your day easier, we have some advice. There are plenty of options for unlocking your device, and they all help to make unlocking your phone easier and to prevent a situation where you forget the code for your phone.

Smart Lock
Smart Lock is one of our favorite tools on Android that is unavailable on other platforms. It makes it easy to make sure your phone is always secure, while simultaneously working to stay out of your way when you want access to your device. Basically, Smart Lock offers Android users several ways to unlock their phones when they're using it, while keeping it locked when it's not near them. To turn on smart lock, you'll need to open up your settings menu on your Android device and head into the Security submenu. Under "Device Security," you'll find an option for Smart Lock. Type in your passcode or password to enter Smart Lock, and you'll be greeted with (as of writing) five unique options for unlocking your phone. Let's break each of these down:

- On-body detection: This setting allows you to unlock your device once before disabling the lock for as long as the phone is in your hand or on your person. Using your smartphone's array of sensors, the device tracks when your device is in use, so you can turn the display off but keep the phone unlocked while it's in your hand. When your phone realizes that it's been set down, your phone will automatically re-lock, requiring a password. This isn't the most secure method Smart Lock offers, but it is pretty cool.

- Trusted places: Sure, it's one thing to keep your phone locked when you're out on the town, but what about when you're sitting in your apartment watching Netflix and you just want to be able to use your phone without constantly worrying about your password? Trusted places works to use the GPS in your phone to detect that you're in a secure location of your choosing, and automatically keeps your phone unlocked for you. As soon as you leave your location, your phone relocks, keeping things safe and secure for you and your device.

- Trusted devices: This might be the best of the five Smart Lock options, because it's ideal for keeping your devices safe when you're nearby and keeping your phone locked when you've left. Do you own a smartwatch, a fitness tracker, a set of wireless headphones, or any other device that syncs over Bluetooth? Trusted devices might be the option for you, allowing you to keep your phone unlocked when your phone is paired with your gadgets. Smartwatches and fitness trackers are ideal for this, but it also helps you keep your phone unlocked when driving in your Bluetooth-equipped car, when running with Bluetooth headphones, or when paired with a set of Bluetooth speakers.

- Trusted face: Plenty of phones have had a face unlock feature, though none of them are quite as secure as the FaceID method on the iPhone X. Still, if you want, you can enable Trusted Face on your device in order to allow your camera to automatically unlock your phone when it recognizes you. However, Trusted Faces is much more easily fooled than the above methods, especially since a photo of you—or even a lookalike—could unlock your phone without having to use any security. Use this one with caution.

- Voice Match: Voice Match is a bit different than the other options on this list, because largely speaking, it's used to activate Google Assistant more than unlock your device. Here's the deal: turning on Voice Match allows you to access your Google Assistant every time you say "OK Google," even while the screen is off. Once you've enabled that ption, you have a second choice: "Unlock with Voice Match," which allows you to automatically unlock your phone when the sound of your voice saying "OK Google" matches the saved voice model on your device.
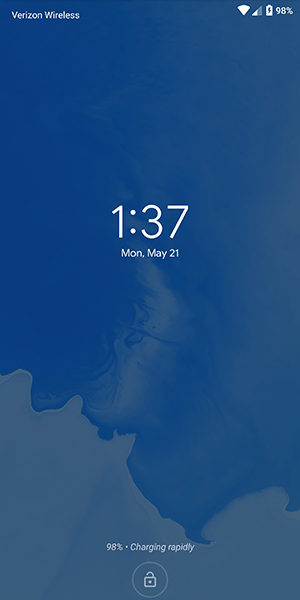
You can enable just one or all five of these, so don't worry if you like the idea of Trusted Devices but don't want to use On-Body Detection. If Smart Lock makes you feel like you can't properly keep your smartphone secured while enabling these settings, you don't need to worry. Every Android smartphone with Smart Lock enabled has the ability to lock the device manually, requiring a passcode or fingerprint in order to use the device properly. At the bottom of your lock screen is a small lock icon that allows you the choice of manually locking your phone. How you use it is actually a little different depending on your device; for example, Samsung devices have you press the icon to lock the app, but the Pixel phones have you press and hold the icon.

Once you've done this, your phone will give you a small notification alerting you that your device has been manually locked, and that the device will stay locked until you're ready to manually unlock with either your fingerprint (if you've turned this on) or your passcode. Manually locking your phone disables all smart locks, so even if you turn on a trusted Bluetooth device, you'll have to either input your passcode or password, or use your fingerprint to unlock the device if you have biometric security enabled. We'll talk more about fingerprints in the section below, and more specifically, how you can keep your biometric data from being used against you on upcoming versions of Android.
Smart Lock is one of those features that seems like a no-brainer, since it's so damn easy to setup and use to your benefit. That said, using Smart Lock obviously raises security concerns overall, since it does keep your phone unlocked more often. You'll want to play around with Smart Lock to find the right combination of security and ease of use for you. Maybe that means unlocking the device when it's attached to your car's Bluetooth and when you're at home, but keeping it secured at work and leaving on-body detection disabled. Whatever the right combination is for you will likely be a personal decision, but with five different modes of Smart Lock available, you have plenty of options and combinations to choose from.
Fingerprints
Almost every Android device in 2018 has a fingerprint sensor equipped on the body of the device, allowing you to easily access your content without having to go through the hassle of entering your passcode every time you use your phone. Fingerprints aren't a perfect unlocking method, but they're fast, secure, and can be equipped with up to four fingerprint entries on most phones. If you aren't using the fingerprint sensor on your device, you should enable it if only to create a backup option. Even if you prefer to unlock your phone by using an unlock method like a PIN, pattern, or password, fingerprints are perfect if you're ever in danger of accidentally locking the device without knowing the proper password.

If you aren't one to use fingerprints to unlock your phone, one step you could take to ensure you never forget your passcode is set the fingerprint on your phone to unlock with a finger that isn't your thumb or index finger. For example, try using your pinky finger or your ring finger as a way to program a fingerprint without making it obvious. You'll always have the option to use your fingerprint as a backup if you forget your code, but otherwise, you'll be good to go when it comes to always having a way to unlock your phone. You could also try using the fingerprint of someone you intensely trust, like a partner or a child, if only to keep a backup that doesn't happen to be with you all the time. This is especially good if you're worried about being forced to unlock your phone by law enforcement, a pressing matter that is becoming more prevalent all the time.
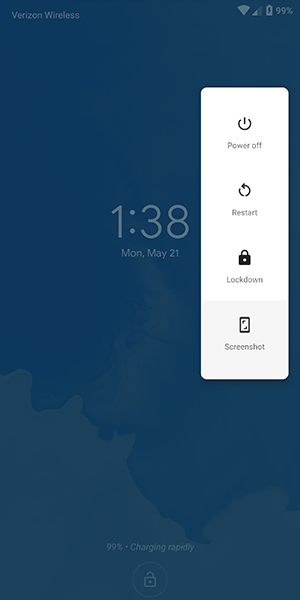
Finally, if you're still worried about logging your fingerprints on your Android device due to security concerns, the upcoming release of Android P has a security feature built-in that allows you to quickly disable fingerprint scanning if you find yourself at risk of being forced to unlock your device. Called "lockdown" in the settings menu, the option allows you to immediately disable both fingerprints and Smart Lock, just by using the option that appears within the power menu on the lock screen. It only disables those features for one lock, but if you're in a place where you're worried your biometric or smartwatch lock features might be used against you, it's a great option to feel more secure.
Notes and Reminders
If you're the type of person who likes to use a complex password on their phone and balks at the idea of using any of the smart unlock features we highlighted above, you might want to consider using the lock screen text display as a way to leave yourself helpful notes and tips to make remembering your password that much easier. Every Android device on the market today has support for placing a message on the lock screen, and you can display some pretty long messages. While most people use this as a way to label their phone (the example in Android is "Joe's Android"), you can also use it to set what amounts to old password hints from Windows and other desktop operating systems.

So, for example, if you've set your password as the name and birthdate of your daughter (ie., "elizabeth1217"), you could set the reminder on your lock screen as "ebbirth", for "elizabeth1217." This can be done for any password, even if it's a random phrase. "Candy90erring60Blinders," for example, could be hinted at on your lock screen with "Reese's, Jewelry, Sunlight." You'll still have to work to remember the numbers and the correct words that match up with the other content, but it can go a long way in helping you to remember what your password is without giving it away. Again, this is totally optional, a way for users to remember their long passwords without having to deal with giving it away or writing it down.
Password Managers
This final tip is for those among us who have a reputation for forgetting passwords and passcodes. If you're always worried about losing your password to your phone and getting locked out, you might want to try using a password manager like Lastpass or 1Password, which allows you to save all your passwords in one place with a single unlock, typically requiring a fairly long phrase in order to gain access to your passcodes. We recommend Lastpass for password manager beginners, because it's free and works with all your devices out of the box. We recommend writing the passcode down somewhere safe and secure in your house, then saving your phone's password inside of Lastpass for safekeeping. It might seem like an odd choice, and certainly won't speed up the unlocking process if you do manage to forget your password, but it's always good to have a backup unlock method to keep your phone's data safe.

***
Losing access to your phone is a nightmare. It's where all of your personal data, from bank account information to photos of your family and friends, lives and is kept safe. Being locked out of your data can feel like the end of the world, but luckily, it doesn't have to be. Whether you're worried about locking yourself of your account, or you've recently updated your phone's password and want to make sure you don't lose it, there are plenty of options to ensure you don't lose access. And even if you have, you aren't completely out of luck, thanks to the various options that exist for getting back into your account.
If you're looking for a way to unlock your phone faster, there's all sorts of opportunities to make sure your Android device is ready for you to login without having to enter your password every time. Biometric security has become fairly commonplace in the mobile arena, and likewise, Smart Lock on Android has made it easy to keep your device secure when it needs to be and unlocked when it doesn't. Overall, the security options on Android have become so plentiful that there's no reason not to keep some kind of security on your Android device. Just make sure you remember the password before you save the account information.
@EVERYTHING NT
Related articles


